You can add a security resource to a data service in two ways:
The first way is to use the ALDSP Console to set elements and attributes that should be secured based on a security policy set by an administrator. This technique works in most cases for which you want to add a security policy.
The other way, described here, is to create a custom security resource for an entity or library data service in Studio. The custom security resource is used directly in an XQuery expression to secure all or part of the service's return type. You can use the same custom security resource more than once in a single data service.
You can add a security resource to any data service, physical or logical, entity or library.
Create the Security Resource
You add a security resource to a logical entity service in Studio and then activate it using the ALDSP Console.
You can follow these steps on a physical or logical entity service. Be sure the service has a query map and a primary read function.
To create a security resource:
Open the service in Studio.
Make sure the Properties tab is displayed:
Window > Show View > Properties
Click Overview, then Properties.
Expand the schema in the center. Locate the element you want to add the security resource to.
In the Properties tab, locate Security Resources.
Click the Add New field below it, then click .
In the Value column, enter the name of the element you want to secure.
Use just an element name (CUSTOMER), not a pathname (CUSTOMER_PROFILE/CUSTOMER) or a variable ($CUSTOMER). You can use a simple element, a complex element, or the root element of the return type.
If needed, add more security resources and elements.
Click the Source tab.
The pragma statement at the top of the XQuery source file shows the new security resource:
The next step is to add a condition to the return type so that it is returned only if the caller has access. To do this, make changes visually in the Query Map. You want to add a conditional statement to the service's primary read function, something like this:
declare function tns:read() as element(cus:CustomerOrder)*{
for $CUSTOMER in cus1:CUSTOMER()
return
        <cus:CustomerOrder>
            {
            if (add-authentication-expression-here) then
            	<CUSTOMER>
	                return type here ..
	        </CUSTOMER>
            else
            	<CUSTOMER>{return nothing here}</CUSTOMER>
            }
        </cus:CustomerOrder>
To add the conditional statement, you need to:
Create an if .. else conditional statement.
In the if clause, add an expression to check if the caller is authenticated and define what is returned.
In the else clause, define which elements are returned if the caller is not authenticated.
The following example shows how to create a security resource on an element in the return type, using the primary read function.
Create the If Condition
Click the Query Map tab.
At Select Operation, choose the primary read function.
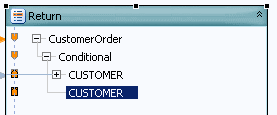
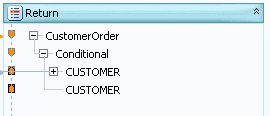
In the return type, right-click the element for which you created a security resource in the Properties tab. Choose Make Conditional.
A node named Conditional is added to the return type.
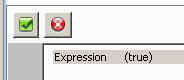
Click the Conditional node.
You see the default conditional expression, (true), in the expression editor.
Make sure the Design Palette is displayed (Window > Show View > Design Palette), then click it.
Expand:
XQuery Functions > Data Services Access Control Functions
In the mapping area, click the double arrow icon to open the expression editor.
Click the expression label in the editor.
Double-click (true), then delete it.
Drag the function fn-bea:is-access-allowed from the Design Palette to the editor.
fn-bea:is-access-allowed($label, $data_service)
For the $label argument, enter the name of your security resource as a string within quotes.
Use the same name you used in the Properties tab.
For the $data_service argument, enter the namespace-qualified name of your data service as a string within quotes:
Click the Source tab, and check the read function. Make sure it has no errors.
Notice that the new expression is added to the if expression in the read function:
declare function tns:read() as element(cus:CustomerOrder)*{
for $CUSTOMER in cus1:CUSTOMER()
return
        <cus:CustomerOrder>
        {
            if (fn-bea:is-access-allowed("CUSTOMER", "ld:logical/CustomersAndOrders.ds")) then
            	<CUSTOMER>
	                ...
		</CUSTOMER>
	   else
		<CUSTOMER>
			...
		</CUSTOMER>
	}
Click Save .
You now need to define what is returned in the else clause.
Create the Else Condition
Click the Query Map tab.
In the return type, click the second conditional element.
In the expression editor, enter "NA", and click Save .
Click the Source tab.
The read function now shows the return value for the else clause as the string "NA".
declare function tns:read() as element(cus:CustomerOrder)*{
for $CUSTOMER in cus1:CUSTOMER()
return
        <cus:CustomerOrder>
            {
            if (fn-bea:is-access-allowed("CUSTOMER", "ld:logical/CustomersAndOrders.ds")) then
            	<CUSTOMER>
	                <CUSTOMER_ID>{fn:data($CUSTOMER/CUSTOMER_ID)}</CUSTOMER_ID>
	                <FIRST_NAME>{fn:data($CUSTOMER/FIRST_NAME)}</FIRST_NAME>
	                <LAST_NAME>{fn:data($CUSTOMER/LAST_NAME)}</LAST_NAME>
	                <SSN?>{fn:data($CUSTOMER/SSN)}</SSN>
	                ...
	        </CUSTOMER>
            else
            	<CUSTOMER>{"NA"}</CUSTOMER>
            }
        </cus:CustomerOrder>
}
Assign Security Resources
The next step is to use the ALDSP console to create a security policy.
All you need to do in the ALDSP console is create a security policy. You have already created a custom security resource and added it to an XQuery function or procedure.
Test Security
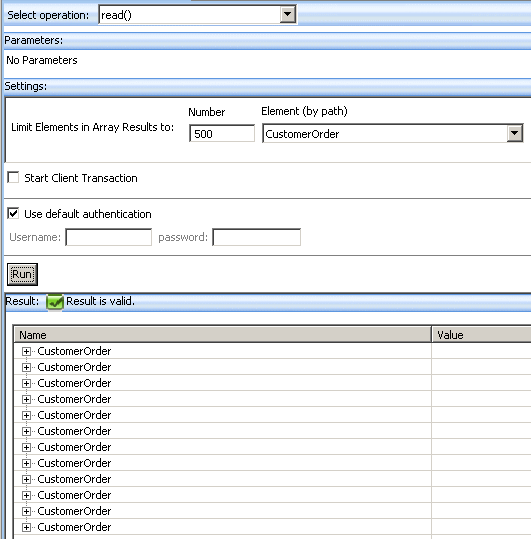
Once you establish security resources, you should test security in Test view.
To test a security resource:
Open the service in Studio.
Click the Test tab.
At Select Operation, choose the function you want to test.
Enter any parameters the function requires.
Expand Settings and enter the authentication credentials you want to use.
Click Run.
Check that the function returns either valid results if the authentication credential passes the security policy, or the string NA if it is not.
 .
.
 to open the expression editor.
 .
.